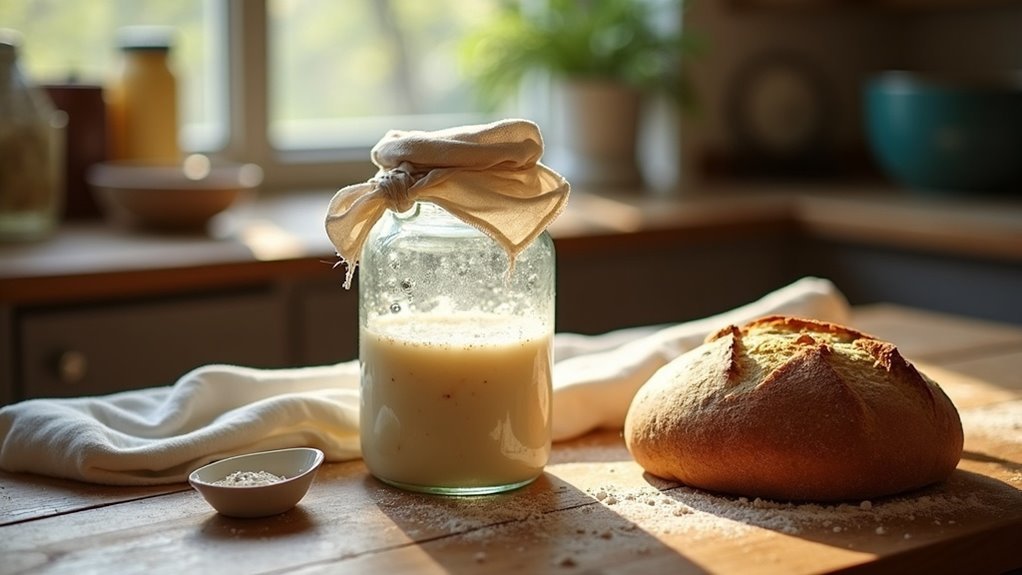
To maintain sourdough without a fridge in a survival situation, it’s crucial to feed your starter every 12 to 24 hours using equal parts starter, flour, and water. Monitor its activity closely, as warmer temperatures may require more frequent feedings. If daily usage isn’t feasible, employ short-term strategies such as using cooler water or reducing hydration levels to slow down fermentation. For longer-term storage, dehydrate your starter and store it in an airtight jar to preserve its viability. Want to learn more survival tips for keeping your starter thriving in challenging conditions? There’s a wealth of information available to help you prepare!
Key Takeaways
- Feed the sourdough starter every 12 to 24 hours using a 1:1:1 ratio of starter, flour, and water to ensure it remains active and resilient.
- Regularly monitor the starter’s activity levels for signs of rising and falling, which will help you adjust feeding frequency as necessary to maintain its strength.
- In warmer conditions, increase feeding frequency to prevent over-fermentation and hooch buildup, which could compromise the starter during uncertain times.
- Use cooler water and decrease hydration for short-term storage, allowing you to feed the starter every 3 to 5 days while ensuring it remains viable in a prepping scenario.
- For long-term storage, dehydrate the starter and place it in an airtight container to preserve its viability, ensuring you have a reliable source of leavening for baking when resources may be scarce.
Understanding Sourdough Starter Maintenance
Understanding how to maintain your sourdough starter is crucial for ensuring you have a reliable food source during challenging times.
To keep your starter lively and ready for baking, regular feeding is necessary every 12 to 24 hours at room temperature, depending on your specific environment. A simple feeding ratio of 1:1:1—equal parts starter, flour, and water—helps maintain its activity while minimizing waste.
Regularly feed your sourdough starter every 12 to 24 hours with a 1:1:1 ratio for optimal baking readiness.
In warmer conditions, you may need to increase feeding frequency to prevent over-fermentation, which can compromise your starter’s health. By consistently monitoring its activity and adjusting your maintenance practices, you can sustain a robust culture without refrigeration.
With diligent care, your sourdough starter can thrive, providing you with essential nourishment for your baking needs, even in unpredictable situations.
Daily Feeding Schedule for Your Starter
To maintain your sourdough starter in a survival situation, establishing a consistent daily feeding schedule is crucial, especially when refrigeration isn’t available.
Each day, feed your starter approximately 5g of starter, 5g of flour, and 5g of water. This small quantity minimizes waste while ensuring your starter remains active and healthy.
Be mindful of the ambient temperature; warmer environments may necessitate more frequent feedings. Keep an eye out for signs of activity, such as rising and falling, to adjust your feeding schedule as needed.
With diligent care, your starter can thrive without refrigeration for up to a week, helping you avoid over-fermentation and spoilage—key factors in long-term food sustainability.
Short-Term Storage Solutions
When you need to store your sourdough starter for a short period as part of your survival preparedness, adjusting your feeding schedule becomes crucial.
By using cooler water and reducing hydration, you can effectively slow down fermentation and maintain your starter’s viability with minimal effort.
Regularly monitor its activity, and remember to use a loose lid for proper air circulation, ensuring it remains in prime condition for when you’re ready to bake again or need to utilize it for food supply strategies.
Adjusted Feeding Schedule
If you’re planning to step away for a few days and want to ensure your sourdough starter remains viable while you focus on survival preparations, it’s crucial to adjust its feeding schedule.
Use a small amount of starter—just 5g—combined with 5g of flour and 5g of water. This reduced ratio minimizes fermentation activity, helping your starter stay healthy for longer.
If you need to maintain a small amount of starter over an extended period, consider feeding it every three to five days. Be aware of the temperature; warmer conditions may necessitate more frequent feedings to prevent spoilage.
Remember to discard excess sourdough as needed to keep your starter balanced and ready for use in your survival cooking plans!
Cooler Water Techniques
Adjusting your sourdough starter’s feeding schedule is a strategic move, particularly if you’re preparing for an extended period away from home. Utilizing cooler water, around 60°F, effectively slows down fermentation, making your starter easier to manage during times of uncertainty. Opt for a 1:1:1 feeding ratio and consider a stiffer starter by reducing the water content. This approach minimizes fermentation activity and waste, extending the longevity of your starter, which can be crucial for survival situations.
| Technique | Benefit |
|---|---|
| Cooler Water | Slows fermentation |
| Less Starter | Minimizes waste |
| Stiffer Starter | Extends longevity |
| Infrequent Feedings | Reduces maintenance effort |
| Cool Storage | Maintains health |
Short-Term Storage Options
Maintaining the viability of your sourdough starter during short-term storage is essential for survival preparedness, and it can be achieved with a few strategic adjustments.
To store your sourdough without refrigeration, consider reducing hydration and inoculation levels by using less water and starter in your feedings. Keeping it in a cooler location will help stabilize the temperature, thus slowing down fermentation—a critical factor when resources are limited.
If you miss a feeding, you can adjust by lowering the flour and water amounts to minimize waste while ensuring your starter remains viable. Aim for daily feedings with small amounts to help maintain its health, which is crucial for long-term sustainability.
During warmer conditions, use cooler water and place your starter in a shaded area to protect it from heat, ensuring it remains ready for use when needed in your survival efforts.
Long-Term Storage Methods Without Refrigeration
When it comes to long-term storage of your sourdough starter without refrigeration, two effective methods can ensure your cultures remain viable for survival situations.
First, you can create a dehydrated starter by spreading it thinly on a baking sheet until it cracks easily. Once fully dried, store the shards in an airtight jar, which can be a crucial resource in a preparedness scenario.
Alternatively, consider crumbling your ripe starter into dry flour. Let it air out for an hour to promote stability, then seal it away to prevent moisture absorption—essential for long-term storage.
When it’s time to revive your dried starter, soak the shards in warm water for about an hour before mixing with fresh flour and water to reactivate those vital cultures. This way, you’ll have a reliable source of leavening for your bread-making needs even in challenging conditions.
Dehydrating Your Sourdough Starter
Dehydrating your sourdough starter is an essential skill for survivalists and preppers, as it can significantly extend its shelf life and ensure you have a reliable source of leavening for your bread-making needs. To dehydrate your starter, spread a thin layer of your active starter on a baking sheet and allow it to dry until it becomes brittle and cracks. Once dried, break it into shards and store them in an airtight container to protect against moisture and spoilage. This method allows you to keep your dehydrated starter viable for months, making it a valuable addition to your long-term food storage.
| Step | Action | Notes |
|---|---|---|
| 1. Spread | Thin layer on a baking sheet | Ensure even coverage for thorough drying |
| 2. Dry | Allow to crack | This process may take several hours to a full day |
| 3. Store | Use an airtight container | Protect against moisture to prolong shelf life |
| 4. Revive | Soak shards in water | Rehydrate for about 1 hour before use |
| 5. Feed | Combine with flour and water | Let it sit at room temperature to reactivate |
Reviving Your Starter After Dehydration
Reviving your dehydrated sourdough starter is a crucial skill for any survivalist or prepper looking to maintain a sustainable food source.
Start by soaking the dried pieces in warm water for about an hour to rehydrate them. Once they’ve softened, combine them with fresh flour and water, using the soaking liquid to achieve optimal hydration.
Allow this mixture to sit at a warm room temperature, and soon you’ll observe bubbling activity, indicating that your starter is successfully coming back to life.
This self-sufficient method not only preserves your food supply but also enhances your ability to produce nutritious bread in any situation.
Soaking Dried Starter
To successfully revive your dried sourdough starter, begin by soaking the shards in warm water for about one hour until they soften. This step is crucial in survival situations where having a reliable source of food is essential.
After soaking, combine the softened pieces with 100g of fresh flour and 90g of water, while also retaining the soaking liquid, as it’s rich in beneficial yeasts and bacteria vital for fermentation.
Let this mixture rest at a warm room temperature (78°F to 82°F) for 12-24 hours to encourage fermentation and activity. Keep an eye out for bubbling and rising, which indicates that your starter is coming back to life.
Once you see these signs, you can feed your starter regularly with the usual flour and water ratio to ensure it remains healthy and thriving, providing you with a sustainable source of bread in your self-sufficient pantry.
Feeding for Activity
After successfully soaking and rehydrating your dried sourdough starter, the next step is to feed it for activity, an essential skill for any survivalist.
Add 100g of fresh flour and 90g of water to the mixture without discarding the soaking water, as this helps your starter evenly rehydrate.
Place it in a warm environment (around 78°F to 82°F) for 12-24 hours, regularly checking for signs of bubbles or rise.
Once you notice activity, continue feeding your starter with a typical flour and water ratio.
Keep in mind that regular feedings are crucial to maintaining a healthy starter, ensuring you have a reliable source for baking in any situation!
Community Tips for Traveling With Sourdough Starter
How can you ensure your sourdough starter survives while traveling in a survival situation? Here are some community tips to keep your culture viable:
- Feed regularly: Maintain your starter’s activity by using a simple ratio of 5g starter, 5g flour, and 5g water daily. This will help ensure it’s robust enough for baking when needed.
- Monitor temperature: In warmer climates, your starter may ferment too quickly. Keep an eye on the temperature and increase feedings as necessary to prevent spoilage.
- Dehydrate your starter: For easier transport, consider creating a dried starter. Store it in an airtight jar to minimize feeding needs and ensure it remains viable for longer periods.
- Use proper containers: A sturdy, airtight container—like a Weck jar—can protect your starter from moisture and environmental factors while on the move.
Connecting with fellow survivalists and bakers can also provide valuable insights and tips for maintaining your starter during your travels.
Troubleshooting Common Starter Issues
Maintaining a resilient sourdough starter while on the go can be a challenge, especially when considering the importance of self-sufficiency in survival situations.
Once you’re back at home, you might encounter some common issues with your starter. If you notice a layer of hooch, it indicates that your starter is in need of nourishment; you can either stir it in or pour it off, then feed it to restore its vitality.
If you see a layer of hooch on your starter, it’s time to nourish it for optimal baking performance.
A flat, sludgy appearance is typical—just allow it to sit at room temperature for 2-6 hours to reactivate. If you detect any off smells or mold, it’s best to discard it and start fresh to avoid contamination.
Regularly assess your starter’s activity and adjust your feeding frequency and ratios based on the ambient temperature to ensure it remains robust.
Remember, in survival situations, a thriving starter can be a valuable asset for sustaining yourself and your loved ones.
Happy baking and prepping!